
LiveOn Content Types & Training Tips
Training Tips:
Image Naming Conventions:
- ImageType_CampusAbbreviation_BriefDescription_MonthYear
Examples:
- Hero_AA_DuckPondSpringTime1920x800_05_2021
- Staff_AA_LechtanskiSusan700x700_03_2021
- Basic_AA_StudentsOnCampus1200x800_03_2021
Processing 360 Images:
- To prepare & upload 360 images to the web, please review our KRPANO 360 Documentation (.doc)
Create a New Basic Page
- Hover over 'Content' -> 'Add Content'
- Click 'Basic Page'
- Create a title for the page (Note: This is not actually output anywhere on your page, but creates your default URL pathname)
- Check the appropriate Campus(es) where you would like the page to be placed. (Note: This will add the necessary campus qualifier in the pathname and page title.)
- Click 'Save'
- Click 'Layout' to add/edit content for your new page using Layout Builder.
- Make any necessary changes to the blocks
- Click 'Update'
- If you have other sections of the page you need to edit, repeat these steps
- Once you've completed all of your edits on the page, scroll to the top and click 'save layout'
Replicate an Existing Page of content
- Navigate to the page you wish to replicate
- Click 'Replicate' in the navy menu bar
- New Label: Create a new title for the page (You typically want to include a campus qualifier for ease in keeping track of pages with similar titles)
- Click 'Replicate'
- Click 'Edit' to format your URL Alias
- Uncheck 'Generate automatic URL alias'
- Make the necessary edits to ensure your page follows the appropriate /campus/page-name format. (i.e. /test-page becomes /campus/test-page)
- Click 'Layout' to add/edit content for your new page using Layout Builder.
- Note: You may notice that certain items within a section become out of order when a page is replciated. You can easily drag/drop the blocks into the correct order.
- Make any necessary changes to the blocks
- Click 'Update'
- If you have other sections of the page you need to edit, repeat these steps
- Once you've completed all of your edits on the page, scroll to the top and click 'save layout'
- All content must follow a set campus-specific URL pattern to ensure the correct campus-specific menu displays on the page.
- Set your Campus URL Alias:
- Click 'Edit' to adjust your page settings
- Uncheck 'Generate Automatic URL Alias'
- Type a slash followed by your campus name prior to the existing title (i.e. /test-page becomes /campus/test-page)
- Add a Campus Reference to your Basic Page titles
- Edit your Page Title to include a Campus reference
- Note: make sure the campus name doesn't display twice in the URL Alias as a result of this.
Content Types:
- Article
- Basic Page
- Campus
- Dining Area
- Dining Location
- Event
- FAQ
- Housing Area
- Rate
- Residence Hall
- Shared Page
- Staff
- TCR
Article
Title: Article Name
Article Image: (1920 x 800)
Body: Used to provide event details/description.
Article Placement: Select the Campus(es) where you want the article to be published.
Article Date: Defaults to the current date, can be adjusted if needed.
Scheduling Options (Right Sidebar): Set a date/time to publish and/or unpublish your article content.
NOTE: Once an article is created and published to individual campus locations, subsequent edits have to be made to the individual campus-specific articles. You can no longer edit/publish changes to the event across multiple campuses.
Basic Page
Title: Create a title for the page (Note: This is not actually output anywhere on your page, but creates your default URL pathname)
Basic Page Placement: Check the appropriate Campus(es) where you would like the page to be placed. (Note: This will add the necessary campus qualifier in the pathname and page title.)
Add content to your basic page:
- Once the page has been created, click 'Layout' to add/edit content for your new page using Layout Builder.
- Make any necessary changes to the blocks
- Click 'Update'
- If you have other sections of the page you need to edit, repeat these steps
- Once you've completed all of your edits on the page, scroll to the top and click 'save layout'
Campus
The campus content type controls the default contact information displayed in the campus listing (image, phone, email, etc.) This is also where you associate Housing Areas and Dining Areas or Residence Halls and Dining locations with the Campus.
- If a campus has housing areas and/or dining areas they need to be associated with the campus content type in order to display in various views.
- If a campus does not have housing areas or dining areas, all of the individual residence halls and dining locations need to be added to the Campus content type in order to display in various views.
Dining Area
Title: Name of dining area
Thumbnail: Image of dining area to display in views
Text Area: Brief descriptive text about the area to display in views.
Dining Location(s):
- Add all dining locations associated with the area by clicking "Add New" or "Add Existing" Dining Location.
NOTE: When creating a new dining area, you will need to update the URL alias to include the correct campus qualifier.
Dining Location
Dining Location pages consist of information input on the "Edit" Content Type and "Layout" builder page.
Quick Tips:
- After creating a new dining area, you will need to update the URL alias to include the correct campus qualifier.
- All dining locations must be associated with a Campus or Dining Area content type in order to be displayed in views throughout the site. This is done by navigating to the Campus or Dining Area and adding the new location to list of associated dining locations.
Content Type Configuration:
Title: Name of Dining Location
Thumbnail: Image of dining location to display in views
Location: Building Name
Dining Type: (Select One)
- Displayed in views and on location page
Meal Plan Discount Status: (Select all that apply)
- These are displayed in views and on location page
Accepted Payments: (Select all that apply)
Online Ordering (Select Yes ot No)
Dining Locations Filter (Map) - UP ONLY
- Select the category grouping for the dining location on the map. This will support the interactive filtered map experience.
Layout Builder Configuration
Location Description (Basic Text Block)
- Click configure to edit the text for the location description
Location Images
- Click configure to Add, remove, and rearrange location images. Drag and drop images to rearrange their order. Click Update to save.
Location Hours
- Click configure to adjust the default hours using the hours of operation block. The hours of operation blocks are being used to populate the Dining Locations & Hours view which requires a few additional settings.
- Title: Location Name - this field is used to display the name of the location on the "Dining Locations & Hours" View.
- Display Title: Unchecked - We don't need this title to display on the location page, it is intended for use on the "Dining Locations & Hours" View.
- Campus: Set the campus location in order to have the block appear on the overarching "Dining Locations & Hours" page.
- Dining Area: If applicable, assign the location to an area for filtering on the "Dining Locations & Hours" page.
To add/update a new set of hours (i.e. Holiday Break hours):
- Click "Add Block" in the existing section.
- Click "Create Custom Block"
- Select "Block - Hours of Operation"
- Title: Location Name - and description of alternate hours (i.e. Blue Burrito - Thanksgiving Break Hours) Remember - this field is used to display the name of the location on the "Dining Locations & Hours" View and will need to differentiate from the standard hours block.
- Display Title: Unchecked - We don't need this title to display on the location page, it is intended for use on the "Dining Locations & Hours" View
- Hide from Display: Use this to checkbox to turn your break hours block on and off in between uses. When this box is checked, these hours will NOT display on the individual location page or hours page.
- Campus: Set the campus location in order to have the block appear on the overarching "Dining Locations & Hours" page.
- Dining Area: If applicable, assign the location to an area for filtering on the "Dining Locations & Hours" page.
- Configure the hours accordingly
- Click "Add Block"
- To add a new Title in between hours of operation blocks on the location details page:
- Click "Add Block" in the existing section.
- Click "Create Custom Block"
- Select "Title"
- Input your title (i.e. Thanksgiving Break Hours)
- Heading Level: h4
- Title Style: Short Separator Light
- Alignment: Left
- Drag the new block(s) to rearrange the order of multiple hours blocks and titles within the section.
- To remove a set of hours from display (i.e. Holiday hours):
- Hover over the block to display the pencil icon
- Click "Configure"
- Check "Hide from Display"
- Click "Update"
NOTE: Do not DELETE the Hours of Operation Blocks between use. This will break the view functionality.
Quick Links
- Click configure to edit, remove or add new Quick Links to the list
- Update the URL and/or Link text for existing Quick Links and click "Update"
- To Remove a Quick Link, just delete the content from the URL and Link Text Fields and click "Update"
- Click "Add Another Item" if you need an additional URL/Link Text available
Meet Our Staff
- The section is populated by the "Staff" Content Type - Tag the staff member with the individual location and they will display in this section.
Come Visit Us
- These maps should be set for your individual locations. If you need to edit the map link or image, click configure.
Dining FAQs
- This section is populated by the FAQ content type. The questions must be tagged by Campus and "Dining" or "Meal Plans" to display in this view.
Event
Title: Event Name
[x] Full Page Display: Check this box if you want your event to link out to a full-page display (intended for use when events have images and descriptions longer than 20 words)
Location: Event Location
Event Image: (1920 x 800) - Only displayed on "Full Page Display"
Event Dates: If the event is a single day, use the same date as start and end date
Event Start Time: Enter the event start time (if applicable). "Events" that do not include a start/end time will be listed as "All Day Events"
Event End Time: Enter the event end time (if appliable)
Category: Select the appropriate category for the event (single select)
Event Placement: Tag the appropriate campuses where the event takes place.
Summary: Used to provide custom teaser text on the event views. Leave blank to use a trimmed version of the Body text.
Body: Used to provide event details/description. This text is trimmed after 20 words. If the body is longer than 20 words, you will want to check "Full Page Display."
NOTE: Once an event is created and published to individual campus locations, subsequent edits have to be made to the individual campus-specific events. You can no longer edit/publish changes to the event across multiple campuses.
FAQ
Question: Enter the Question
Answer: Enter the Answer
Order: Used to adjust the order of questions within a specific category. Lower numbers will display before higher numbers.
Campus: Select the appropriate campus(es) where you would like this content to exist.
Category: Select the appropriate category for the question.
SubCategory: You have the ability to write-in a Sub Category to further group your FAQs within a specific category. Questions without a subcategory will be grouped by "General"
Audience: Select all audiences to which the question applies.
Anchor Link: Create an anchor ID in order to link directly to a specific FAQ. Enter the ID in this field and then create your anchor link to include that specific question's ID.
Housing Area
Content Type:
Title: Name of housing area
Thumbnail: Image of housing area to display in views
Text Area: Brief descriptive text about the area to display in views.
Residence Hall(s):
- Add all residence halls associated with the area by clicking "Add New" or "Add Existing" Residence Hall.
Layout Builder:
- Housing Area pages will include a Hero Image and view of all locations associated with the area.
- UP Housing Areas: To include an overview of "Your Commons" and "Area Contacts" - This content is to be edited using the layout builder.
Rate
Add a new rate via the Rate Content Type:
Title: (Leave Blank - The system will create a title upon Save)
Campus: Select your campus via the dropdown list
Residence Hall: Start typing the name of the hall you'd like to create a new rate for. This is an autocomplete field.
Building Type: Stater typing the building type (i.e. Traditional, Renovated, Apartments, etc.). This should align with the building type already assigned to the residence hall.
Room Rate Type: This is an open text field to assign the room type for the rate. Typical Room Rate Types include: Single, Double, Quad, Suite, etc.
Occupancy: Add the expected room occupancy for the rate.
Academic Year: Start typing the appropriate academic period. This is an autocomplete field. Note - Summer is typically handled as a separate "Academic Year" and therefore will require a separate rate to be entered. If you do not see the academic period you need in the list, contact the Web Team.
Rate Period (Fall, Spring, Maymester, etc.): Type the rate amount in the appropriate semester field. Be sure to include the necessary dollar/numeric formatting - this field will be displayed exactly as is. (i.e. $3,423)
Graduate and Family: Leave unchecked for all undergraduate housing options.
Update Rates for a new academic period via the Rates Importer: (The file(s) should be prepared for testing a week ahead of the actual go-live date/time.)
- Access your rate template (.csv file)
- Review the list of residence halls and room types per hall and add or remove additional line items as needed.
- Note: The fields for Campus, Residence Hall, and Building Type have to be an exact match to the way the content is referenced in the CMS. If you are adding new line items, make sure there are no typos, extra spaces, etc. in these fields.
- CWC Note: Due to the duplicate of Cedar Hall at both Altoona and Berks, the Berks Cedar Hall rates will always need to be manually added/updated using the Rate content type.
- Update the occupancy and rate values for the appropriate semester as needed.
- Be aware that entering a number range while editing CSV file opened in Excel will convert to a date. You can manually fix it after saving by opening in a text editor or you can use Google Sheets which eliminates the issue.
- Save the rates file as a .csv
- Email [email protected] to coordinate the file import to a Staging server.
- Review and approve the import on the Staging server or work with Web Team to correct any file issues.
- Aggregate of all the rates can be reviewed at https://liveon.psu.edu/rates but each Campus's rate page should be inspected. Sometimes caching issues crop up and need to be addressed
Residence Hall
Residence Hall pages consist of information input on the "Edit" Content Type and "Layout" builder page.
Note: All residence halls must be associated with a Campus or Dining Area content type in order to be displayed in views throughout the site.
Content Type Configuration:
Title: Name of Residence Hall
Thumbnail: Image of the residence hall to display in views
Building Type: (Select One)
Population: Enter numeric value
Building Amenities: (Select All that Apply)
Room Types: (Select All that Apply)
Room Amenities: (Select All that Apply)
Shared Spaces: (Select All that Apply)
Living Arrangements: (Select All that Apply)
Layout Builder Configuration
Location Description (Block - Basic)
- Click configure to edit the text for the location description
Location Images (Block - Image Carousel)
- Click configure to add, remove, and rearrange location images. Drag and drop images to rearrange their order. Click Update to save.
Quick Links
- Click configure to edit, remove or add new Quick Links to the list
- Update the URL and/or Link text for existing Quick Links and click "Update"
- To Remove a Quick Link, just delete the content from the URL and Link Text Fields and click "Update"
- Click "Add Another Item" if you need an additional URL/Link Text available
Room Diagrams: (Block - Image Carousel)
- Click configure to edit, remove or add new images to the room diagram section
- Click "Remove" to remove any existing images
- Click "Add Media" to upload a new image or select an existing image from the media browser
- Adding a new image:
- Set the Focal Point: Use the white + that appears in the center of the image to adjust the focal point for your image. This is helpful when using images in multiple locations on the site that may have different size specifications. This defaults to the center of the image.
- Add Alternative Text (required): Use descriptive language to describe the details of the image for screen readers.
- Add a Title (optional): The title field will be displayed as a caption in the full-size view of the image carousel functionality.
Room & Furnishing Dimensions: (Block - Accordion)
- Create a table including the items and dimensions for each hall. Be sure to follow the tips for creating accessible tables.
Building Floor Plans: (Block - Accordion)
- List links to available floor plans.
Virtual Tour 360 Photos (Block - Call To Action)
- Add link to the 360 Photo (if available)
Meet Our Staff
- The section is populated by the "Staff" Content Type - Tag the staff member with the individual location and they will display in this section.
Come Visit Us
- These maps should be set for your individual locations. If you need to edit the map link or image, click configure.
Housing FAQs:
- Housing-related FAQs for that campus will automatically display in this view.
Shared Page
Use to create a central source of content that can be shared across multiple campuses.
To create a new piece of shared content:
- Hover over Structure --> Block Layout --> Custom Block Library
- Click "+ Add Custom Block"
- Scroll to the bottom of the list and click Shared Content
- Give your block a name/description and click "Save"
- You should see your new block display at the top of the list.
- Click "Edit" and then select the "Layout" tab
- Build your page of shared content using the layout builder
- Click "Save Layout"
To create a New Shared Page:
- Hover over Content --> Add Content --> Shared Page
- Create a title for your page
- Place your shared content on the page by typing the name of block you created
- Select the campuses you would like to publish an instance of the shared page to
- Indicate whether or not you would like to have a main level "LiveOn" version of the page created as well
- Click "Save"
To edit the content on a Shared Page:
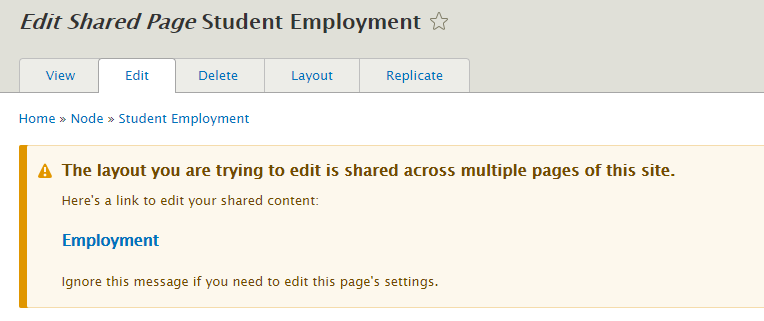
- How to determine if you are trying to edit a "Shared Page":
- From the "Content" overview tab, the page will be labeled as "Shared Page" under "Content Type" instead of "Basic Page"

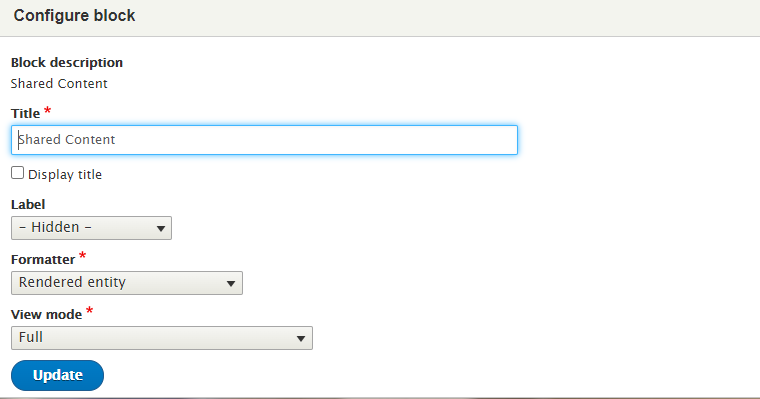
2. When you go into "Layout" and try to configure a block you are presented with this screen:
3. When you click "Edit" on a shared page you are presented with this notification:
To edit the shared content block:
- Click "Edit" on the shared page
- Click on the blue hyperlinked text link in the yellow banner, this will take you to edit the shared block for that page
- Make the necessary changes to the shared content and click "Save Layout"
- Note: This action will take you back to the "shared block" page. To review your changes on the shared page, click on the Content tab or use the site menu to navigate to the page in question.
Staff
Use to create a staff directory item with name, image, title, email, phone, and brief descriptive text (optional).
Staff Image: Suggested image dimensions 700w x 700h.
Title*: Staff Name
Text Field: Job Title. Use this field to enter the staff member's title.
Email: Use this field to enter the staff member's email address
Phone: Use this field to enter the staff member's phone number
Text Area: Optional text area for more information.
Campus:
- Select the campus(es) where this staff member works
Dining Location:
- Click "Add existing Dining Location" and start typing the name of the dining location into the auto-complete field. Click "Add Dining Location". This will tag the staff member to display under the staff listing for that dining location page.
Residence Hall:
- Click "Add existing Residence Hall" and start typing the name of the hall into the auto-complete field. Click "Add Residence Hall". This will tag the staff member to display under the staff listing for that Residence Hall page.
Unit
- Assign the staff member to the appropriate work unit.
Add Staff Members to Contact Us page using the new Sort Queue (UP Only):
- Once you have created a new staff member, you will need to add them to the "Contact Us Sort Queue" in order for them to display on the Contact Us page.
- Click on the link for the unit you want to add the new staff member to:
- Housing Operations
- Food Services
- Residence Life
- Conference Services
- Commons Desk Operations
- Housing Assignment Office
- Scroll to the bottom of the list and type the name of the staff member in the open auto-complete field, then click "Add Item"
- Drag and drop the staff members in the list into the order you would like them to display and click "Save"